My So Happy In The Kitchen series is dedicated to giving you tools, resources, and knowledge to help you learn to love to cook. Each month this year, I’ll be diving into a different ingredient group, offering tips, tricks, and of course recipes. The article is dedicated to prepping vegetables like a pro!
Let's Prep That Veg!
This month’s lesson is Vegetables 101! Over the next month, I’ll be introducing you to the vegetables that are in season during Winter and Spring, along with the cooking and preparation methods that are commonly used.
So far I’ve talked about the seasonality of vegetables and why it’s important to seek out options that are in season throughout the year. Last month I also shared an article all about knives, including suggestions for which blades every kitchen should have. So now, let’s put it all to practice! Grab your favorite (in season!) veg, your sharpest chef’s knife, and let’s get to work. We’re prepping vegetables!
Storing, Cleaning, and Preparing Vegetables
In this article I’ll share how to store, clean, and prep the seasonal vegetables that are available during Winter and Spring. First, these are the details I’ll share for each vegetable:
Step 1: Storing Your Vegetables
Properly storing your vegetables will save you time, energy, and dollars. Ever found (or rather, smelt!) a potato that had gone bad? How about a head of broccoli that has started to turn colors? I know we ALL have found a bag of slimy green onions buried in the crisper drawer. Suffice to say, the way you store your vegetables matters. Take note of what you store though: the best solution of course is to use what vegetables you have and not allow them to go to waste.
Step 2: Cleaning Your Vegetables
Unless you’re growing your own produce or purchasing from a local farmer, you may not know exactly where your vegetables are from. Or how they got to your market, what spaces they’ve been held in, or how many people have picked up or handled them. Kind of gross when you think about it, right?! The moral of the story is to wash every single piece of produce that comes into your home! However, not all vegetables are created equal, and certain measures should be taken to clean them appropriately.
Step 3: Preparing Your Vegetables
One of the things that inspired me to start my So Happy In The Kitchen series was how many people have reached out asking me how to cut an onion. I realized quickly that a portion of my key audience needed help mastering the basics. So here we are! Below I share common knife cuts to chop, mince, peel, slice, dice, and chiffonade a variety of vegetables that are in season during the Winter and Spring.
Winter Vegetables
Beets
Storing: Unless you have a root cellar (if so, good for you!), beets should be stored in the crisper drawer of your refrigerator. They require some humidity to retain their density, so consider wrapping them in plastic to lengthen their shelf life.
Cleaning: Beets come straight from the ground, meaning they’re bound to have dirt and grit on them. Use a vegetable brush to rid them of any grime, which will naturally remove the outer layer. This is ok!
Preparing: This time of year, beets are best roasted. They soften in the oven, allowing you to slice them easily. Place a scrubbed beet with its ends removed on a piece of tin foil. Drizzle lightly with olive oil and wrap. Roast in a 375 degree oven for 45 minutes. Cool before peeling, and slice.
Brussels Sprouts
Storing:These “baby cabbages” store best in a plastic bag in your crisper drawer. They can keep up to a week (sometimes longer!). They also can be found on their stalk, which makes it somewhat challenging to store unless you have a large refrigerator.
Cleaning: Brussels sprouts require a good rinse, but you’ll be removing the outer leaves. Place them in a colander and run cold water over them until thoroughly rinsed.
Preparing: As mentioned above, these little brassicas do well with the removal of their outer leaves, especially when they visually are lacking quality. Start by trimming the dry end of each sprout, which will make removing the outer leaves simple. You can leave them whole, halve, or chop them to use in a variety of ways.
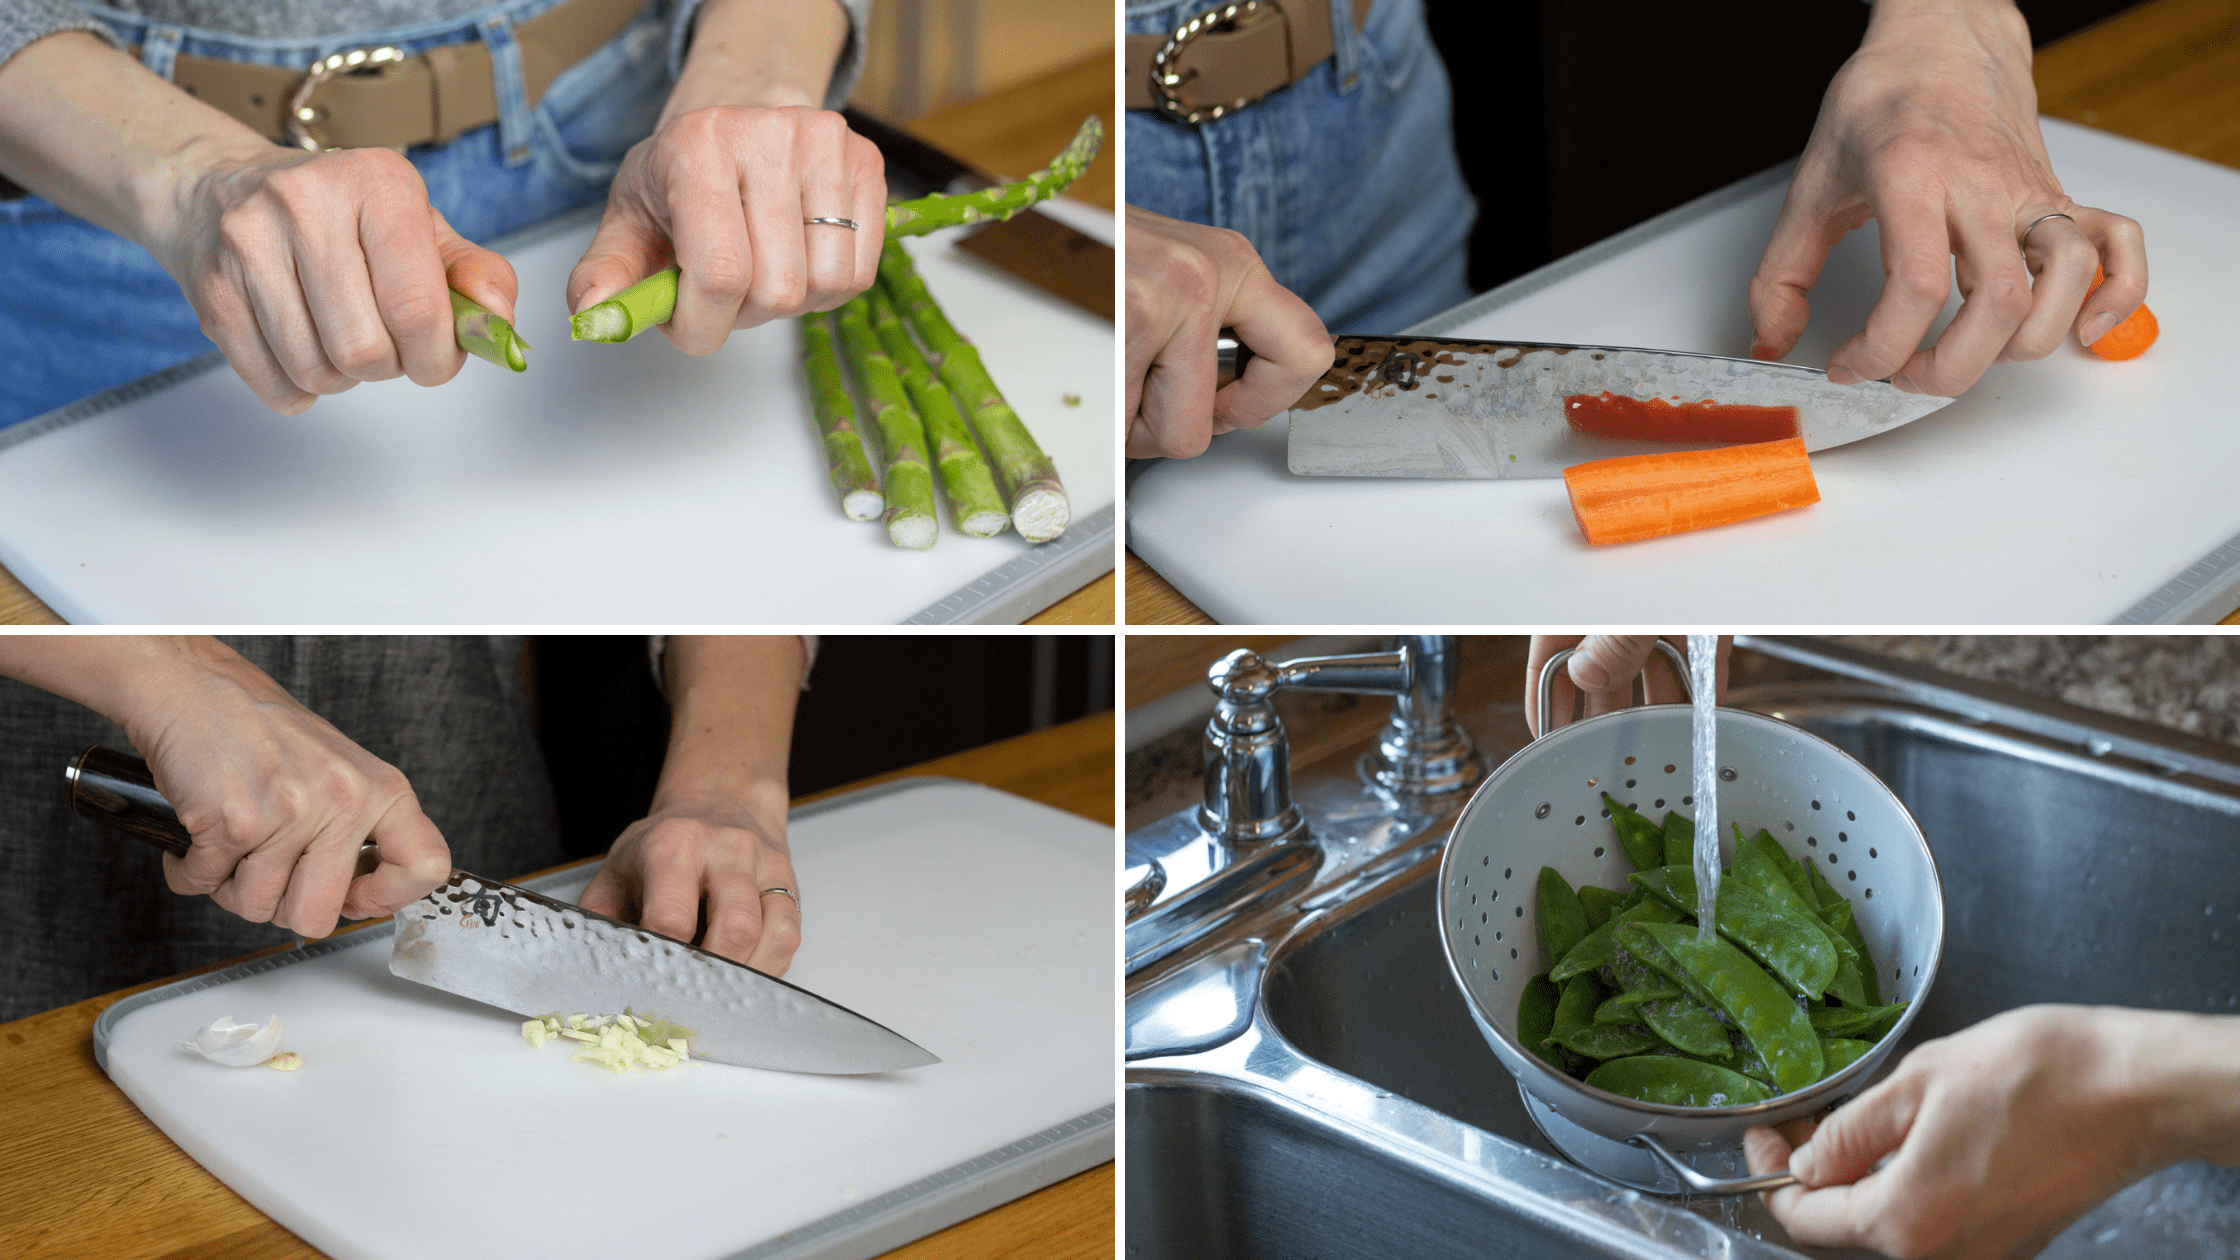
Carrots
Storing: Whole fresh carrots require moisture, so storing them with a damp paper towel can assist in their longevity. Think about those bags of baby carrots. Do they not always have residual water in them? That’s intentional! Be sure to remove any greens from whole carrots before storage though, as they can quicken deterioration.
Cleaning: Like beets, carrots need a quick rinse and scrub. Peeling is a good idea to remove any residual grit or thicker skin.
Preparing: Carrots can be cut in a number of ways. Slicing carrots into rounds is common in a myriad of recipes. Halving and slicing them into sticks is great for snacking. Slicing further into uniform matchsticks leads to the julienne cut. Turn the julienne cut carrots horizontal to the top edge of your cutting board, and chop into bite-sized pieces. Carrots are great vegetables to practice all sorts of cutting methods.
Celery
Storing: There’s a reason why celery is found in the standard plastic bag at most grocers. That’s the best way to store it! After it’s been cleaned and trimmed, you can opt to store sliced celery submerged in water. I like doing this so I have celery ready for snacking. Best to store it this way just for a few days, and keep an eye on the water, changing it out as needed.
Cleaning: Stalks of celery should be separated and rinsed under cold running water, using your fingers to rub away any dirt. Leaves should be thoroughly washed as well if using.
Preparing: Celery is another vegetable that can be cut in a variety of ways, almost identical to carrots. Cut into sticks, sliced, chopped, and on the bias: celery is one of those vegetables you can cut any way. Don’t forget the leaves, too: they pack incredible flavor to salads, stri-frys, and soups.
Kale
Storing: Kale and other hearty greens that are in season, such as collards and Swiss chard, store nicely in a plastic bag in your refrigerator. Keep an eye to be sure they don’t start to discolor, a sign of deterioration.
Cleaning: Leaves should be stripped from their stem and rinsed thoroughly. I like filling a salad spinner with the leaves and water, allowing them to soak momentarily, swishing them around to remove any grit. Drain and spin, or else use a kitchen towel to remove as much water as possible.
Preparing: Kale can be torn or chopped either roughly or finely, depending on the intended use. A finer chop works great in salads, while a rougher or larger chop is great for soups or for kale chips.
Leeks
Storing: Best stored like so many others on this list, leeks can be placed in a plastic bag in your crisper drawer.
Cleaning: Leeks grow in very sandy conditions, meaning they require a very thorough cleaning before they’re used. First, remove the root end as well as the woody green tips. Slice the leek in half, and add to a bowl of cold water. Allow to sit for 10 minutes, when any residual sand will rinse out of the leeks. If you plan to chop the leeks, you can opt to chop them before you soak, straining the water and sand out.
Preparing: Leeks may be chopped for soups or for sauteeing, or else they’re delicious when roasted after simply being sliced in half!
Onions
Storing: Unlike the aforementioned vegetables, onions should be stored in a cool and dark spot in your kitchen or pantry. Ensure they have plenty of ventilation, meaning no plastic bags and bins that don’t have holes in them. I use a basket to store all of my onions which I keep in a dark cabinet.
Cleaning: Onions won’t need much cleaning, as you’ll be peeling the outer layer off when you prep!
Preparing: As I’ve previously mentioned, how to chop an onion was one of the questions I’ve received that really made me think about launching this series. The below images walk you through the following steps of chopping an onion:
Remove both ends.
Create a shallow slice from end to end.
Peel away as few outer layers as possible.
Slice onion in half (place onion cut side down and cut beginning at one cut end, if you’re wanting onion slices).
Place onion cut side down and create two horizontal cuts, minding your fingers.
Create multiple vertical cuts through the onion.
Begin slicing through the onion, which will yield a uniform chop.
Continue chopping until the desired size of chop is met.
Removing ends of onion.
Slicing outer layer.
Removing outer layer.
Slicing onion in half.
Creating horizontal slices.
Creating vertical slices in onion.
Slicing onion.
Chopping onion.
Potatoes
Storing: Potatoes should be stored the same way as onions: in a cool and dark location with plenty of ventilation.
Cleaning: Like beets, potatoes grow in the ground which means they will have residual dirt and grit that should be washed away. Use a vegetable brush to give them a thorough scrub under running water.
Preparing: The beloved potato can be prepared in countless ways. Of course, they’re delicious baked whole. Place a scrubbed an cleaned potato that has been pricked with a fork multiple times on a piece of tin foil. Drizzle lightly with olive oil and sprinkle with large flaky salt. Bake for 45 minutes at 400 degrees or until softened. Potatoes can be peeled, but don’t need to be.
You can slice lengthwise in to 1/4 inch slabs, then slice in to sticks. Those sticks can then be cubed, which is great for roasted breakfast potatoes. They also can be super thinly sliced or shredded.
Winter Squash
Storing: Hearty squash should be stored in a cool and dark place and can keep for weeks. I keep all squash stored in the same place as my potatoes and onions.
Cleaning: Giving squash a good rinse is a good idea, even if you plan to remove the thick skin.
Preparing: Regardless of the type of squash, you should remove the seeds and squishy innards before preparing it. Squash can be halved and roasted whole or stuffed with a savory filling. To remove the skin, follow these steps and refer to the images below to cut butternut squash:
Start by lobbing off both ends.
Remove the larger bulbous end.
Set each end on its cut side, carefully using your knife to remove the skin.
Slice the long “neck” portion into long slabs.
Slice each slab lengthwise, creating sticks.
Slice to cube!
Spring Vegetables
Asparagus
Storing: Asparagus is best stored in a glass of water in the refrigerator. Once you get it home, give it a good rinse. Hold each stalk with one hand on the sliced end, and the other on the stalk. Gently bend until the woody end snaps off, and place each spear in a glass of water. Use within a few days.
Cleaning: As outlined above, a good rinse will do!
Preparing: Asparagus can be roasted whole or sliced on the bias in stir-frys.
Broccoli
Storing: Like so many other vegetables on this list, broccoli stores best in a plastic bag in the refrigerator. It will last relatively long this way, but when you start to notice discoloration, that’s the first sign of spoilage.
Cleaning: Rinse the whole head of broccoli before removing the larger florets. Be sure to not wash broccoli before you store it, however, as extra moisture will lead to deterioration.
Preparing: Using a large chef’s knife, remove the larger florets from the stalk of broccoli – but don’t toss it! The stalk is delicious and tender once you peel the thick skin away.
Garlic
Storing:Much like onions, garlic requires a cool and dark location with plenty of air circulation. I store mine with my onions, potatoes, and squash.
Cleaning: No need to clean! You’ll be removing the papery skin as you prep.
Preparing: A head of garlic includes multiple cloves which are all connected to a root. Remove the papery skin and pluck a clove from the head. Here’s what you need to know about chopping garlic!
Remove the root end.
Place a chef’s knife over the clove, and using your other hand, smash the knife against the clove. A little “pop” of the fist should do it! Gently peel away the skin, and remove the clove.
Keeping your fingers tucked back, hold the clove in place as your begin to run your knife through it. Keep the sharp end of the knife on the cutting board as you slice it through the clove.
Use a gentle rocking motion to move the knife back and forth over the clove, using your hand that isn’t holding the knife to steady the top edge.
Chop to desired consistency!
Take care to remove garlic from knife as you continue to chop.
Mushrooms
Storing: Store mushrooms in the packaging they came in, which in most cases will be a plastic-wrapped container. Otherwise, store in a paper bag for up to one week. If they start to smell or look slimy, these are obvious signs that they’re past their prime.
Cleaning: Mushrooms require a specific way of cleaning so their texture isn’t impacted. Wet a paper towel or kitchen towel lightly with water and brush off any visible dirt. If you’re cooking with foraged mushrooms, you should rinse thoroughly, but ensure you’re removing as much water as possible and allow them to dry afterward.
Preparing: The number of mushroom varieties out there is vast, so for the purposes of this article, note that I’ll show you how to prep basic white button and Baby Bella mushrooms. Mushrooms like these can be roasted whole, making a delicious side dish. The stem can be removed, chopped, and included in a stuffing for the mushroom caps. The mushrooms may be sliced or chopped, which is great for stir-frys or even mixed in to burger mixtures!
Spinach
Storing: Spinach can be found in most grocers either in plastic bags or plastic clamshell containers. The latter will prevent bruising and further damage, but regardless, consider the following to lengthen the spinach’s freshness.
Cleaning:Wash spinach and dry in a salad spinner to remove excess water. Arrange spinach on a kitchen towel and blot to completely dry. Getting the spinach totally dry is key! You can then store the clean leaves in a plastic bag with a paper towel.
Preparing: Spinach leaves range in size, so depending on your intended use, you may want to chop them. You could also chiffonade spinach if you’re wanting uniform thin strands of the nutritious green for salads, soups, or steaming.
This guide offers guidance on storing, cleaning, and prepping vegetables.
Peas
Storing: Peas should be stored in a way that allows for airflow. Pressing them too tightly into a container can prevent spoliage. Perforated plastic bags are a great option, and will keep peas fresh for up to a week.
Cleaning: Peas will need a good rinse or quick soak in water to rid them of any residual dirt.
Preparing: Peapods will have a fibrous string on their seam which should be removed. To do so, simply snap one end of the pea and pull along the seam. The string should naturally follow. Peas are small enough to steam, saute, or blanch whole, but you can also chop or snap them in to bite-sized pieces if you prefer.
Find this collection of prepping vegetables helpful? Check out my “So Happy In The Kitchen” page, where I share helpful roundups of products, ingredient and cooking method education, and recipes tips and tricks! You can also shop all of my favorites here.
Just a note re the section on PEAS. The comment about pressing them too tightly into a container says it will prevent spoliage. Not sure you meant prevent as the previous sentence said they need air flow.
Also spoliage should be spoilage. 😏
Otherwise very helpful information. Thank you
Thanks so much for the note, Sandra! You’re right – that is definitely a mistake! Thanks for letting me know, I will update the article for accuracy. Thanks again!